November 24, 2013

DIY Christmas decorations _ Christmas stars / flowers

CHRISTMAS STARS / FLOWERS

This must be one of the easiest, yet cute decorations to make! Each star takes 2min to do and the cost is basically 0.
You'll need:
1 toilet paper roll per star (or decorative paper)
scissors
stampler
thread
hole punch

1. Cut the toilet role into 6-8 pieces (each one is around 1 cm thick). Each circle will be a petal
2. Staple two circles together at the bottom of each one. You will now have 4 pairs.
3. Start stapling  the pairs together.
4. Punch a hole in one of your "petals" and thread a thread through the hole. Make it as long as you wish depending on if it will be a Christmas tree decoration, or as part of a garland.
DONE!
----
If you are using decorative paper instead of a toilet paper role you'll have to add a step.
You will have to hold the circles in place when stapling the pairs together, as each one won't be a circle, but only a strip. It just takes a little extra patience, but it isn't too complicated.
The paper I used for these is wallpaper samples that I had left over from my wedding DIY decorations. In particular the unique ceremony programs:
http://pulmonate.blogspot.it/2011/12/wedding-inspirationceremony-program.html

What you need


2. cutting the toilet role into 1cm thick pieces.

3. Stapling the pairs together


Stapling the pairs with each other, creating our star / flower


The extra step when one is using decorative paper instead of toilet paper roles.


The finished star / flower.

DIY Christmas decorations _ clay Christmas tree decorations

This is a fairly simple decoration to make and the result is very sweet.
You will need:
Clay (white or natural)
cookie cutters or a knife
a small round object (I used a pencil)
a roller (I used a bottle)

Work the clay until it is soft.
Roll it out until it is about 3mm thick. Any thinner and you risk it to break and any thicker means it will take longer to dry.
Place your cutters out onto the clay in order to optimize the space. A smart way to get "2 in 1" is by placing a circular cutter and then a smaller cutter shaped as a heart or a star on the inside. This way you have one that has a circular shape with a star or heart hole, and one in the shape you placed on the inside.
You can carve a little message into the clay if you wish, or leave it plain. You can carve the year, family members names, or messages such as MERRY XMAS, LOVE, HOPE, etc.
Make a small hole in the top part of the shape in order to be able to thread a thread through the hole and hang it up.


An example of "2 in 1" shapes. A Circle with a heart or a star inside creates 2 pieces.


Clay decorations are put on a piece of paper to dry.

November 16, 2013

DIY Autumn Christmas Decorations

As soon as it starts getting cold, I start thinking of Christmas time. I love this time a year when you can spend time making decorations, drinking hot drinks, and singing.
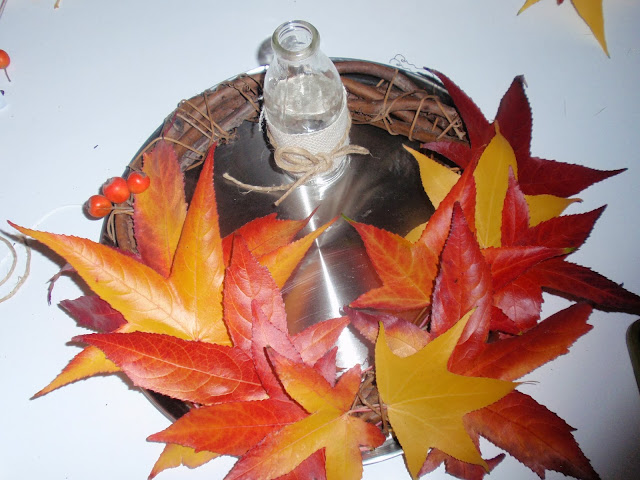
I started with two wooden wreaths about 20cm in diameter. They are just twined together and held together with a thinner twig wrapped around the thicker ones.
I collected some colourful leaves and berries. One of the wreaths is a table decoration and the other will hang on the door.


These are the two wreaths. The table decoration to the right, which isn't finished yet. I want to add some moss to cover the plate and add some berries and pine cones.

The colourful door wreath.


The table decoration with a candle and chocolate chip cake.


July 20, 2013

Balcony make-over.

I recently had the idea of making a sofa for my balcony and I'm not regretting that choice for a second. I used to have 2 wooden chairs and a table, which, theoretically was a good idea for eating out on the balcony. But the sofa is a different deal. It's so relaxing to lay there in the morning sun eating your breakfast, sunbathing, drinking a glass of wine in the evening or having an afternoon nap. I'm out there so much more now.
So what about the sofa? It wouldn't take a reader long to know that many of the things I write about on my blog are about DIY, so of course I had to make the sofa by myself! I picked up 3 wooden crates, put one up against the wall and two on the floor and "tada" it was all done. I cut an old mattress in 2 in order to give it the proper bend, and covered it all with a strong light fabric.
What else did my balcony need? Storage space. And what did I do to get it? Recycled DIY of course!
I felt a bit like a crazy woman keeping my eyes out near the bins on the street, but it was worth it. I'd stop my bike in the middle of the road and run over if I saw a beautiful wooden box. Then balancing it all the way home. My husband was making fun of me every time I'd come home with a new box. The result is 5 stacked up wooden boxes that are filled with pots, candles, pegs, seeds, etc. One I've used for the table, and its perfect because it gives me space inside of it for storage, and also a good solid table.
One corner is for the pots which I placed on one of the small wooden crates as well as an old kids wooden chair that I found while searching for boxes.
A bbq made out of a terracotta pot and a grill I found in the same size. Coal in the pot and it's finished. Great for just making a quite steak for 2.
Final touches were pillows, a mat, pots, etc.
The wooden box storage and table.


My balcony wouldn't be complete without Peanut by my side. Here seen in action licking my leg.


Home made ladder (check earlier posts) with can candle holders (also see earlier posts).

Old children's chair with a pot with mixed plants.


Tomatoes and the herb corner. Pots placed on wooden crates.

The wooden box table on a 3euro Ikea rug, Peanut sunbathing on the sofa.

DIY _ recycled paper mache lamp

I made this gorgeous lamp a few months ago. Check out the instructions on how to make one for yourself


The cable I had bought in Sweden wasn't adapt for Italy, so a friend of mine was nice enough to modify it for me and help me assemble it. And I just love it. It gives a lot of character to the room and I just adore having something unique at home that I made. The lightbulb that I've used is a very large clear lightbulb but I'm going to change it for a matte one, or with lower Watt as now its too bright and hot.
This lamp is made out of newspaper using a paper mache technique. The outside has then been painted white and the inside has been painted turquoise. I made some holes on purpose in order to create  a more interesting light.  

The lamp at night time with my dad's painting in the background.


May 26, 2013

DIY _ ladder

 This is a tutorial on how to make your own ladder. Mine is only for decoration purposes but it could be used as a proper ladder if needed. 
What you'll need:
_ wooden sticks that won't break under the weight of an adult. Depending on what type of wood you find, they'll need to have various diameters. How many depends on how high you want to make it. I had 2 1,5m long sturdy branches, and 4 branches of the same length, about 40cm long.
_ String. I used natural string twine.
_ a hand saw if they're not already in the right lengths.

 
I often start DIY projects without actually knowing what I'm going to do exactly or how it'll turn out. The gardener in the park downstairs had just cut of some Birch branches (which happens to be my favorite tree after the olive tree). So I took some of them without knowing what I was going to do with them. This is what I came up with, and now that I have a ready ladder, I actually don't know what I'll do with it. Haha. Any suggestions?

1. Use your two most sturdy branches as your vertical ones. Hold your smaller branch horizontally and tie your string around both. Wrap the string diagonally and tie a double knot the first time and then continue to wrap it around: diagonally in front, behind and up diagonally, around the top, diagonally down, in front and diagonally up.
If you are going to be using this ladder for real, you'll need to wrap it around more times than I have done here.


The finished ladder, which I'm still not sure what I'm going to do with it. But it looks good, doesn't it?
I'm either thinking to hang small pots from it, or photos, or actually, I have no idea!

DIY _ tin tea box

This is a sweet vintage look DIY tutorial. The good thing about following a tutorial is that someone has tried it before you and can teach you about which mistakes they made. It took me a few goes to get this right, so you can go ahead and do it well straight away!
You'll need:
_ an empty cookie tin 
_ spray paint in 2 colours
_ a piece of card
_ a colourful piece of rigid paper (I used some tapestry I had at home- I ordered a free sample for another DIY project)
_ scissors
_ tea bags

Step 1. Get any dogs or children out of the way. My curious chihuahua was there the whole time :-p


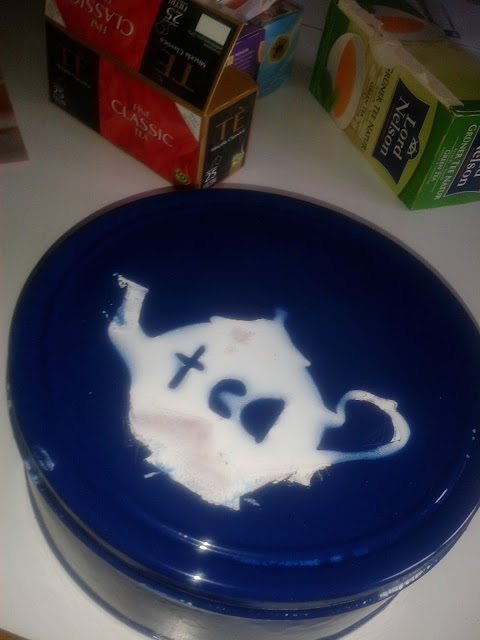
2. Place some paper down in order not to get paint on your floor. I did all this on the balcony as the smell of the paint isn't very pleasant. Spray the tin on the outside. Let it dry completely (follow times given on spray can). I think it's about 20min for touch dry and several hours for complete dry. You only need to do 1-2 layers of your first colour.

Cut out your shape on a piece of card. I got inspiration from an old vintage tea-pot. Place it on the lid and spray with your second colour.

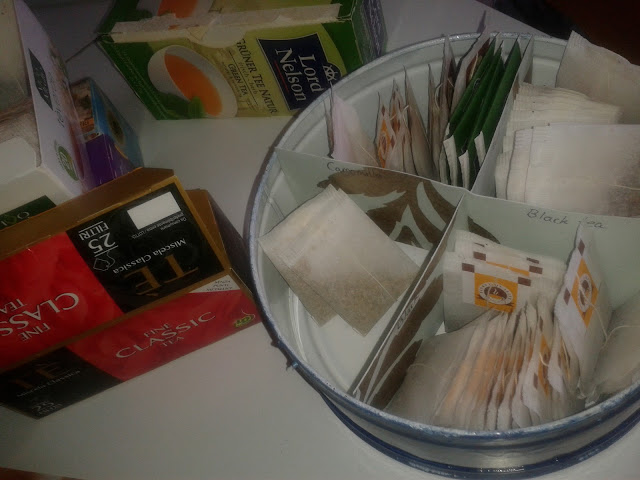
In order to create a division for the different types of tea, measure the diameter of your cookie tin and cut two strips that are l=the diameter of your tin and h= slightly less than the height of your tin. Cut an incision in the middle of both, half way through.

The incision will allow the two pieces of card to fit into each other.

Write the names of the teas. You'll need to think a little bit in order to write it in the correct place. On the left of one strip and the right of the other, so that when they are put together you'll have the name on both sides.


Place the tea bags in their compartments.

Finished result.
 Now, in order not to make the same mistake as me:
1. Chose the right type of paint! a water based paint will not stick to the tin!
2. Wait! Let the paint dry before doing the next layer. I wasn't patient enough
3. Don't paint the inside of the tin! The spray-paint smells for a long time afterwards and is absorbed by the tea. I had to through the first bunch of tea-bags out and do it again.

DIY _ tin candle holders

 This DIY project is very simple. Wash your empty cans and take off the label. You might need to soak it for a short while in order to make it come off completely.
You'll need:

_ tin cans
_ a nail

_ a hammer
_ tea light candle

Take a nail and simply hammer in holes randomly in your tin can. It's easier to get it through if you place the nail in the down-curve of the tin. If you like you can also make patterns (hearts, circles, etc)
When you have enough holes you're done! You can either hang the cans up by threading a string through 2 of the holes or simply place them on your table as they are.
I hung mine up originally but took them down as the wind made them rattle, which was annoying. So now they're simply on the table and they look great. The light is really sweet and romantic and perfect for a DIY event.


March 24, 2013

Toilet sign _ DIY

Hi!

Today I had this idea for a toilet sign and thought I'd make a prototype. These two rotated exclamation marks
resemble the boy and the girl. I made these easily and quickly out of Forex, which already has a red plastic film on one side. I decided to let the girl have a red dress and a white head and the boy a white body and a red head. I don't know if its been done before but I thought it was quite clever. Cute, aren't they? I wish we had better looking doors at home and this would look even better.


March 20, 2013

DIY _ Recycled paper mache lamp

I really love creating things to have in my home. Design my own clothes, furniture and other objects. If I'm able to make them by myself, all the better. I actually had no idea if this would actually work, but I decided to give it a go anyway.
This paper mache lamp is a great way to use old newspaper you have that would just be thrown out anyway. Paper mache is an easy technique that even children can learn how to do. In fact, making this lamp isn't very different from making a paper mache pinata!
The main difference is that the pieces of paper are cut up in small pieces rather than put on with strips. I wanted the lamp to have a rough "cement" like feeling. I wanted there to be a lot of texture and I also wanted the bottom opening of the lamp to be very uneven, almost like an egg shell.
Follow these steps in order to make a lamp of your own.
You will need:
- a ball or balloon (I used a yoga ball that has a diameter of 55cm)

- newspaper (it's hard to say exactly how much, but i filled a 15L bowl with torn up pieces
- 750g of white paper glue
- water
- Paint if you want it to be a certain colour.


Time required is approximately 4 hours plus waiting time (4 -5 days. Be patient, it needs to be really dry before painting it or you'll have to wait even longer). 
Newspaper in all colours, etc.
After the paper had soaked overnight I ripped the paper even more, making the pieces almost invisible, just a big mush.

I squeezed out most of the water before mixing the glue in. You need approximately 1/3 water and 2/3 white glue. 

The mush with the glue mixed into it.
I prepared my home with some plastic bags underneath so that the glue and water wouldn't drip straight down onto the floor. I also placed the ball on a bucket so that it would be more stable. If you're using a balloon you can hang it up. Remember that it gets rather heavy as you put more of the wet paper onto it, so make sure you tie it up well and that the balloon is strong enough.
I made one layer with paper strips in order to give it a slight base to put the paper mush onto. I will be painting the inside.

This is what it looked like when I started putting the newspaper mush onto the ball. It isn't as thick as it looks here, about 0,5-1cm.

Here it is before drying on the balcony. I added some keywords afterwards: Arte, Libri, teatro, architettura, cultura, ballare, etc.


A close up of the lamp. Note that I wanted it to look quite rough. You can easily smooth it all out as much as you want creating a very smooth surface. It's completely up to you.

I painted the inside turquoise (it seems darker than it is because the paint was still wet here). I LOVE the result!

Check it out! So cool! I'll put up photos soon when it is up. I have to get an electrician (neighbor) here to help me adjusting the light. We have a roof lamp now so the bulb is literally attached to the ceiling and I need it too hang down a bit in order to get the lamp at the right height. Yay. Can't wait!