November 2, 2012

Wedding hair

I had a picture in my mind for how I wanted my hair-do to look like, but I hadn't really discussed it with the hairdresser. I am so lucky that she did an amazing job, without having done a proper consultation or trial beforehand.
The hairdresser, Studio Mar Acconciature, is in Pastrengo, near the hotel where we and all the guests were staying for the wedding.
What I had in mind was quite a relaxed side chingon up-do. But despite it was relaxed, still to look elegant.

My dress (that I designed myself) had an open V back so I wanted to show that off as much as possible, and therefore chose to have an up-do. I've been growing my hair for years thinking forward to my special day. I wanted the hair to have relaxed curls put up in a casual way on the side. I liked the idea of having an unsymmetrical hairdo.

I had made a hair-flower for me and my three lovely bridesmaids to wear. Their hairdos were similar to mine, but slightly more simple, in order to let me be in the center of attention (at least for one day, right?). I'm so very happy of how it all turned out. It stayed perfect the whole night and even looked amazingly even the next day after sleeping and everything. The products she used felt so natural and soft.

Hopefully these pics can inspire you for your hairdo on your day!

This is me at the salon getting ready for the big day. Luckily we were getting married in the afternoon and had all morning to get our hair and make up ready! I don't know how morning brides do it. 


I had just arrived to the ceremony. Marco and I walked down the aisle together and we had already taken all the photos. 

This is the back of my hair do - which I love!
And the side with the signature flower. 

Two of my brides maids and the flower girl. 

My maid of honor and the flowergirl. Here you can see the differences in our hair-dos. Both very  nice. 

Kissing my man! 

The beautiful venue of Castello Scaligero, Malcesine, Lake Garda, Italy. Here you can see my beautiful dress (if I may say so myself - I designed it myself). 

The lovely hair-do from behind. 

Wedding Thank You Card

This is our original Thank You card. The photography done by the very talented Roberta Morellato (Rome, Italy). The venue was absolutely spectacular, which also helped making our day truly special.
We got married in Castello Scaligero, in Malcesine on Lake Garda, Italy. Getting married outdoors overlooking the lake, in a castle, was beyond any childhood fantasy. We had perfect weather and everything ran smoothly. We were overwhelmed by the fact that our family members travelled from so far away to be there on our special day. We couldn't have been more lucky to have such special people in our lives. Family and friends travelled from Australia, Sweden, United Arab Emirates,  all around Italy, Qatar, England, etc.

Our thank you card went in the theme of the whole wedding, from the invitation card to decorations. It was printed on recycled paper. Everything is done on Photoshop. I made the stamp myself, which is the castle in which we got married. The postal stamp says "Italia, Malcesine, 18/08/2012".

Our wedding decoration

 Here are the decorations from our wedding. I did so many things in order to make our wedding as personal as possible. It all turned out amazingly and I was given many compliments. Our guests appreciated the personal touches making them feel special as well.  
 This is a road sign that I made where all the places are indicated where our guests had travelled from to be there for our wedding. 
 The table decorations. The napkin had a champagne coloured ribbon (our colour theme). Fabric flowers, a Protea flower, a pot with grass with the table numbers.
 A close up of the table decorations. 
 The cakes and the cake presentation that I came up with myself. The white chocolate of the cakes resembles the bark of the tree stumps. The beautiful seeds that I had collected over some time. The tin cans with babies breath flowers, and also the cake toppers that I had made of us. 
 The headband for the flower girl. 
 The cake toppers that I made of ourselves. They're made out of Polimer clay that are baked in the oven. 
 The ring pillows with the same lace that we also had around the jars on the tables and of the leg band. 

 The hair flowers that both I and the 3 bridesmaids wore on the day. 
 The window on which I wrote the table seating. Each rectangle had the names of a table. 
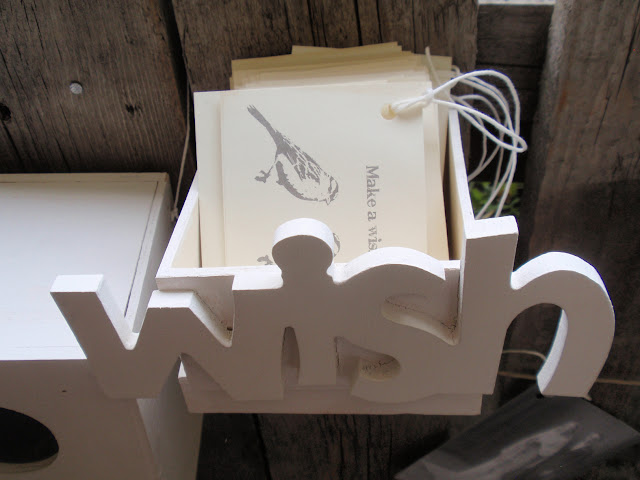
 Wish tags that were placed in the birds house, which our guests wrote their wishes to us. 


 We put photos of our parents, grandparents and other family members on their wedding days. It was a way to celebrate them and show our respect to them.

 The wedding program fans. On the first page it has the program, second page has the bridal party names, the third page had the text of That's Amore which we sang together with our guests after the ceremony. 


 Small flags which the guests waved after we were wed. 

October 24, 2012

Kids Rooms III _ Rooms for many kids

What should you do when your family suddenly gets bigger than expected and perhaps you can't or don't want to move to a bigger house or apartment. How do you create fun spaces for your kids and still letting them have their own space within the room?
I think bunk-beds are a great solution. It's both space saving and with these built-in solutions, allows each kid (2-4 in these examples) have their own private space. It's like sleeping in a cubby house every night. Even when they get slightly older they have their own space that they can close up.The space on the ground still allows they siblings a space in common where to play and have fun.
The solutions can have different appearances: from a more stylish clean-cut room to a childish playful room.

I have previously written two entries about childrens rooms: 
Kids rooms 1
and
Kids rooms 2
This space saving solution looks like great fun. I love how each child has their own space. Their little dens seem like a calm and peaceful place to be with protecting walls. The green colour gives it a nice modern touch at the same time as using a calm gender-neutral colour. 

 This really does look like a lot of fun. Talk about having a cool room to play in!

 The relaxing "sea breeze" feel of this room works well both as a childrens room as well as an extra guest bedroom. This is a good solution if you have a long room but that perhaps isn't very wide and you still want to fit two beds in there. 
 The smart thing about this solution is that you keep all the toys in the attic part, and therefore you don't always have to tidy up as much when you have guests around. That becomes their play area and the sleeping area remains nice and tidy (hopefully). 
 For a more clean-cut look in the minimalistic home. It doesn't really feel like anyone lives here but I do like the bed itself. 
 Another minimalistic suspended bed.
 This is a good solution for that quirkey shaped room that you don't know what to do with. Custom made beds fit into the area in this L shaped room. You can also get foam matresses cut to size if you like. Otherwise, just leave a space beside the matress where you can place a lamp or a glass of water.
 This room has such a nice warm feeling to it. All the spaces inside the walls are used giving a lot of storage place allowing the floor area to be clutter free. Each child gets their own space. The cardboard chairs are also very "green". 
 Here is a single bed version similar to the one above. Having built-in storage space saves a lot of space from the floor area. The space underneath the bed is often an area that remains unused and therefore "wasted". Especially if you have a small room and need to take advantage of each cm, this is a good solution. It does look very cozy in there too!

This sea-side home gives the chance to have 4 beds in the one room. A good solution for a summer home.