Showing posts with label decorations. Show all posts

November 24, 2013

DIY Christmas decorations _ clay Christmas tree decorations

This is a fairly simple decoration to make and the result is very sweet.
You will need:
Clay (white or natural)
cookie cutters or a knife
a small round object (I used a pencil)
a roller (I used a bottle)

Work the clay until it is soft.
Roll it out until it is about 3mm thick. Any thinner and you risk it to break and any thicker means it will take longer to dry.
Place your cutters out onto the clay in order to optimize the space. A smart way to get "2 in 1" is by placing a circular cutter and then a smaller cutter shaped as a heart or a star on the inside. This way you have one that has a circular shape with a star or heart hole, and one in the shape you placed on the inside.
You can carve a little message into the clay if you wish, or leave it plain. You can carve the year, family members names, or messages such as MERRY XMAS, LOVE, HOPE, etc.
Make a small hole in the top part of the shape in order to be able to thread a thread through the hole and hang it up.


An example of "2 in 1" shapes. A Circle with a heart or a star inside creates 2 pieces.


Clay decorations are put on a piece of paper to dry.

November 16, 2013

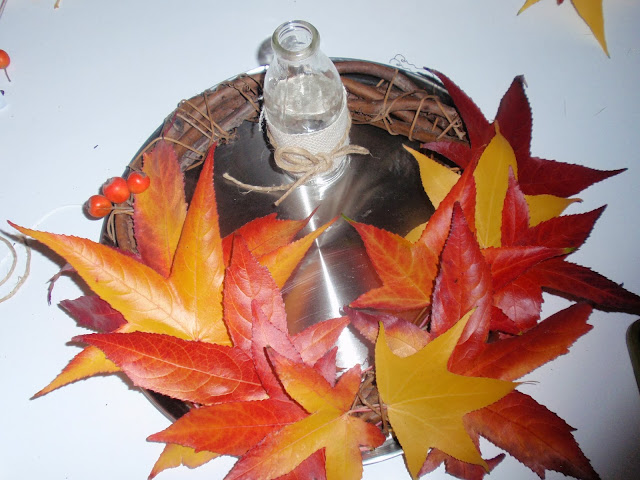
DIY Autumn Christmas Decorations

As soon as it starts getting cold, I start thinking of Christmas time. I love this time a year when you can spend time making decorations, drinking hot drinks, and singing.
I started with two wooden wreaths about 20cm in diameter. They are just twined together and held together with a thinner twig wrapped around the thicker ones.
I collected some colourful leaves and berries. One of the wreaths is a table decoration and the other will hang on the door.


These are the two wreaths. The table decoration to the right, which isn't finished yet. I want to add some moss to cover the plate and add some berries and pine cones.

The colourful door wreath.


The table decoration with a candle and chocolate chip cake.


February 11, 2013

Wedding inspiration board

Inspiration boards are a good way of organizing your thoughts during the planning of your wedding. There are so many things out there to inspire you and one can imagine having the wedding in many ways. It's hard to actually narrow it all down and stick to a certain style. In fact in the beginning of my wedding planning my ideas were all over the place! In the end, I started realizing that there were certain elements that I had really fallen for and a specific style started to emerge.
The first thing we chose for the wedding was the wedding location, and after that we could start thinking of a specific vision that we wanted. The location for our civil wedding was the lovely Scaliger Castle in Malcesine on Lake Garda. Absolutely stunning, right on the lake, with a 180* view of the water and mountains.
I wanted a eco-friendly look, with many DIY elements. I hand-drew the invitation card together with one of Marco's best men, made all the table decorations myself, sew the flower girl dress(tutorial and result), made the ring pillow, made wedding program fans, a road sign with distances to where our guests had travelled to be there,  rice and lavender cones, designed my own wedding dress and had it made, had a song written for us by a good friend. So it was very personal!

To have a look at the final results of the decorations click here.  And for the wedding pictures as a whole (although not the official photos) check them out here.

This is the newer inspiration board that was made about 3-4 months before the wedding. Several things were still changed from this board but it is pretty similar to the final result.
This was the first inspiration board that I made before Marco even officially proposed! We had started talking about the wedding and this is what I envisioned. Not many of these details were actually used though. The skirt of the dress and the flowers remained the same, a location on the water (the country is different though), are the same.

The bridesmaids inspiration board can be seen here.